Hello, this is Shinji from “Warashibe-choja.jp”. Today, I would like to talk about how to tie an obi for men’s kimono, which is often asked by acquaintances. Many people say, “I can wear a kimono somehow, but I can’t tie an obi.” I would like to introduce using illustrations. In addition, we will be uploading videos in the future, so please refer to that as well. For those who can’t remember it no matter how many times they try, we will also introduce a special obi.
- 1. What you need to wear a men’s kimono
- 2. How to tie Kaku-obi – kai-no-kuchi –
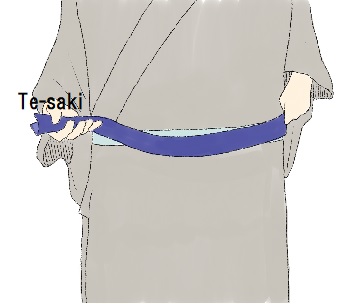
- 2.1. 1, Fold Te-saki in half. (About 30-40 cm from the edge)
- 2.2. 2, Wrap around your body 2 laps (3 laps depending on your physique).
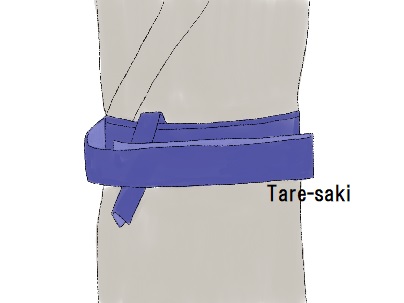
- 2.3. 3, Fold back the excess Tare-saki and stack it to adjust the length. (About 40 cm to 50 cm)
- 2.4. 4, Tare-saki ties under Te-saki.
- 2.5. 5, Fold Te-saki and tie Tare-saki like winding it.
- 2.6. 6, Adjust the shape.
- 2.7. 7, Turn the obi back.
- 2.8. 8, Treatment of wrinkles after turning the obi.
What you need to wear a men’s kimono
1, Tabi (= socks for kimono)
First of all, let’s wear Tabi. If you wear it after wearing a kimono, it may cause you to worn out of shape for kimono, so please be careful.
2, Hada-gi (= underwear)
As with women, men will be dressed in the order of Hada-gi → Naga-jyuban → Kimono. The lower half of the body can be handled with Steteco.
3, Naga-jyuban
Put your arm through the sleeve of Naga-jyuban and pull both Eri-saki in front of you to align the center of your back. Pull the right Eri-saki slightly upward to the left side to fit it to your skin. Then bring Eri-saki on the left to the right. While holding it so that it does not shift, fix it with Koshi-himo just below the navel. At this time, make sure that the collar is aligned properly. From your point of view, make sure that the left collar is on top and that it crosses cleanly in front of you.
4, Kimono
Kimono will be matched in the same way as Naga-jyuban. Make sure that Se-chushin (= back seam) is in the center of your back. Like Naga-jyuban, the left collar is on top when viewed from yourself. In modern Japan, when the collar is reversed, it is called “Shini-Shozoku”, and when a deceased person wears a kimono, the right collar is on top. The correct collar orientation is the letter “y” when viewed from the other party.
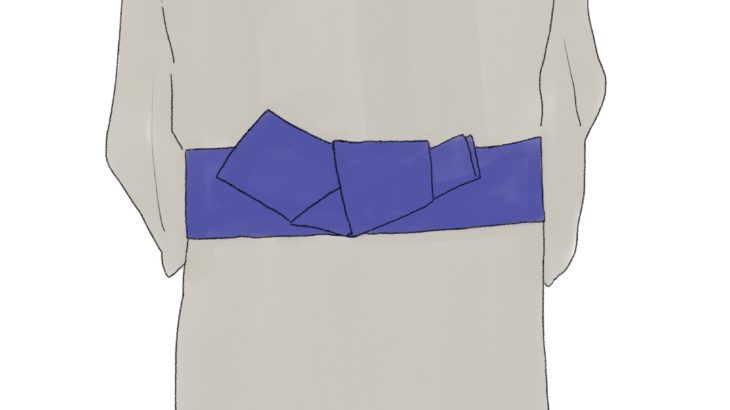
5, Kaku-obi (= men’s obi)
The men’s obi is called Kaku-obi. The length and width are slightly different depending on the type, but the length is about 4 m and the width is about 10 cm. This time, I will explain the most basic method of tying “Kai-no-kuchi” with illustrations later. In the video, I would like to introduce the simpler “Kata-basami” and the new Kaku-obi that looks cool.
6, Haori
After tying the obi, put on Haori. Please attach Haori-himo to the front of Haori. Haori-himo was once said to represent the dignity of men, so there was a tendency to choose something more luxurious. Nowadays, there are various simple ones, so please try to find the one that suits you best. In the past, many kimonos and Haori were made of the same kimono, such as ensembles, but nowadays, it is becoming more common to combine Haori with a different material from the kimono. You can enjoy kimono more fashionably.
7, Zori (= kimono footwear)
Overseas people may feel that kimono footwear = geta, but kimono is basically setta. Geta is a casual footwear, so if you want to wear a yukata casually, you can use geta. When you wear a kimono, be sure to wear a pair of footwear called setta.
Koshi-himo should be Hada-gi, Naga-jyuban, and one each when wearing a kimono, for a total of three.
How to tie Kaku-obi – kai-no-kuchi –
Here, we would like to introduce Kai-no-kuchi, which is useful for obi ties. It can be used for Kaku-obi, but it is also a must-see because it can be used for women’s Hanhaba-obi. In the video, we will introduce “Kata-basami” and “a new type of Kaku-obi that anyone can easily tie an obi”. I think the new Kaku-obi is interesting because it is not the “cheap obi” or “belt type” that it used to be. Please watch it.
1, Fold Te-saki in half. (About 30-40 cm from the edge)
2, Wrap around your body 2 laps (3 laps depending on your physique).
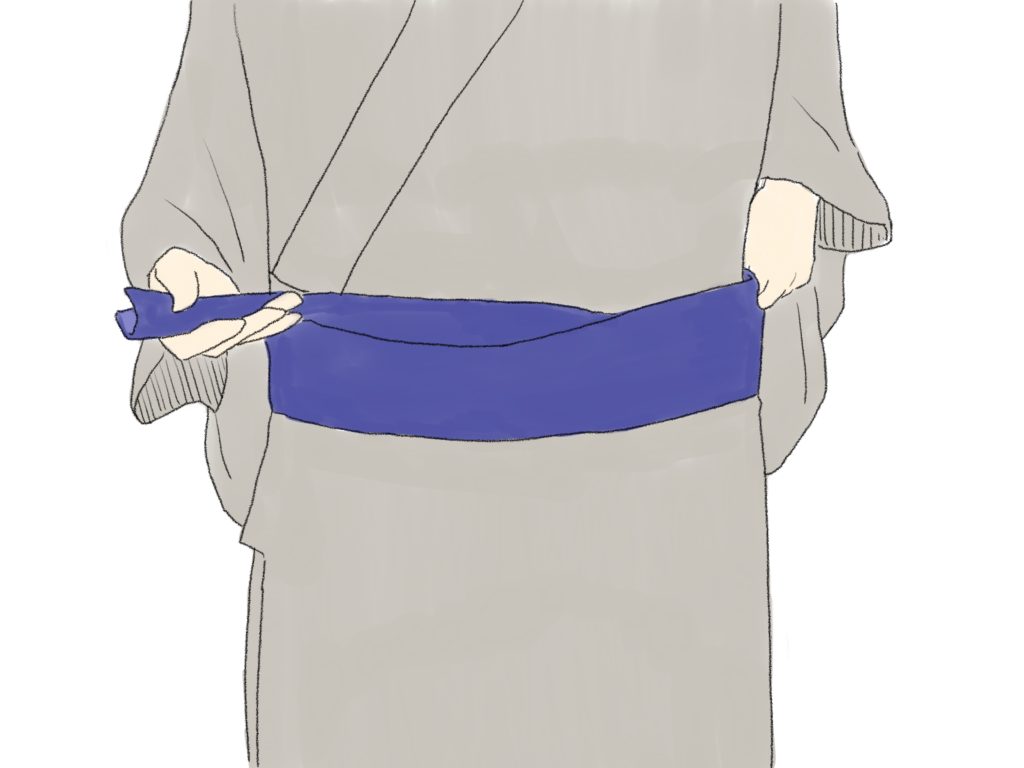
If you tie it while tightening it firmly on the way, the finished product will be beautiful. When tightening the obi, you can tie it comfortably by pulling on the lower part of the obi.
3, Fold back the excess Tare-saki and stack it to adjust the length. (About 40 cm to 50 cm)
4, Tare-saki ties under Te-saki.
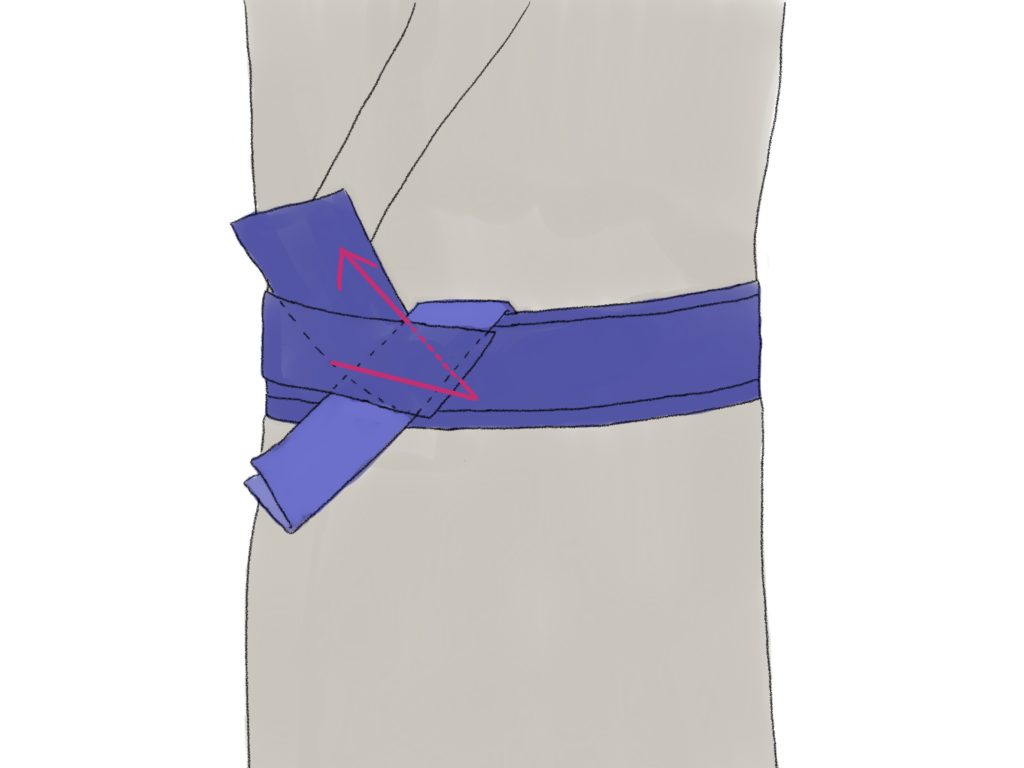
This is the first point to stumble for those who are not good at tying the obi. Please remember that the wider one is on top.
5, Fold Te-saki and tie Tare-saki like winding it.
This is the second point. Please remember that Te-saki (= thin part) is just folded back and not moved. If you remember in steps 4 and 5 that the thin one hardly moves, you can understand it.
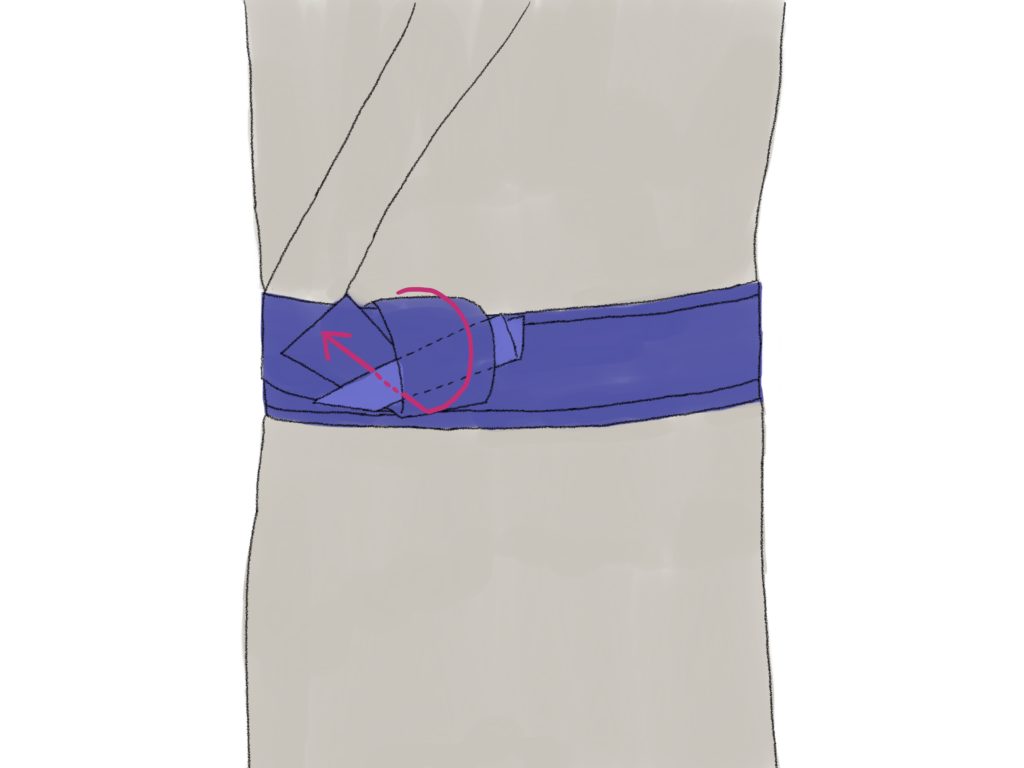
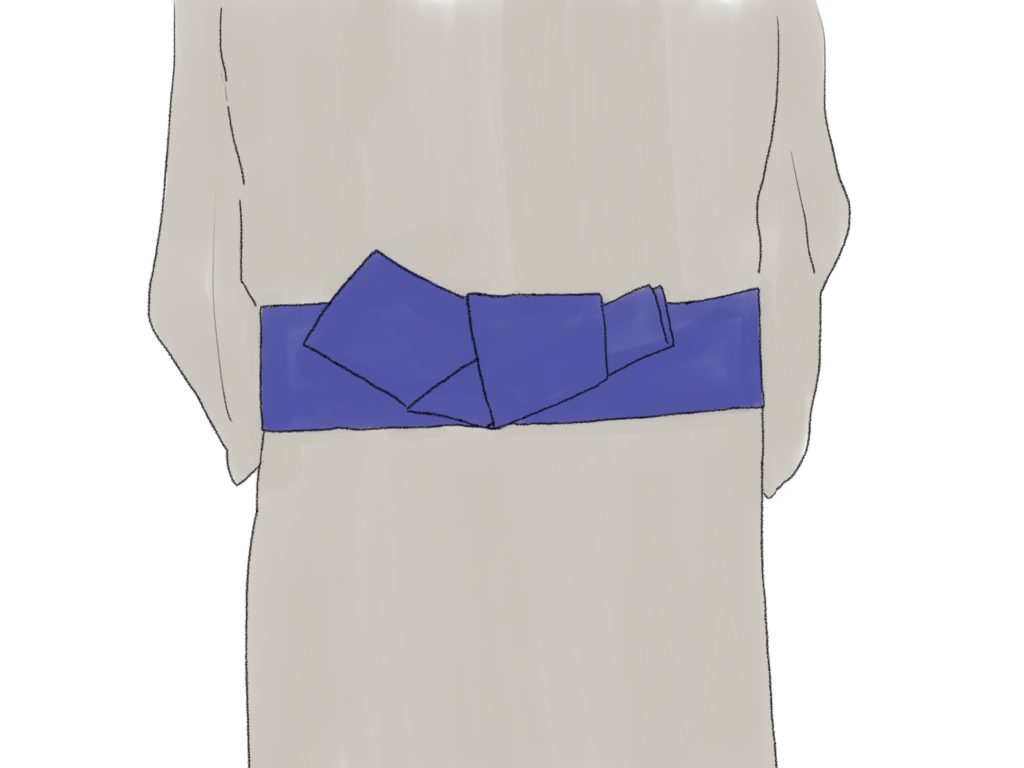
6, Adjust the shape.
When shaping, you can tie it firmly by pulling Te-saki. On the contrary, if you pull Tare-saki, it will lose its shape, so be careful.
7, Turn the obi back.
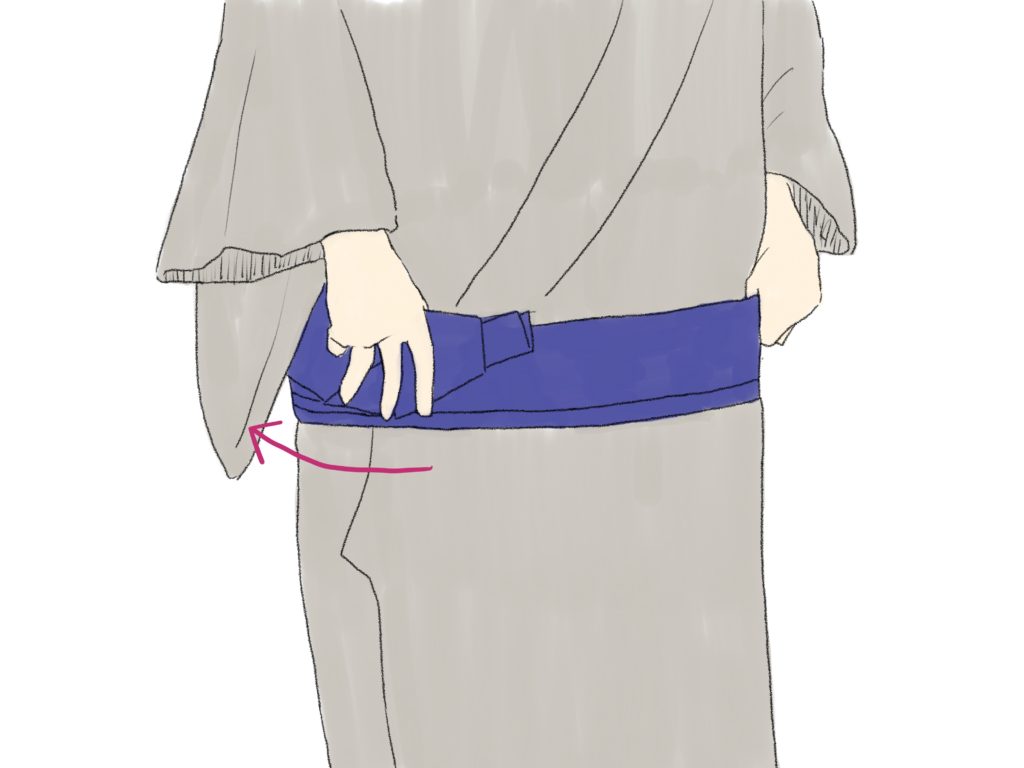
Turn clockwise. Please note that the collar will collapse if you turn it in the opposite direction. When the knot of the obi comes to the center of the back, it looks a little ugly, so it’s done by shifting it to the left or right.
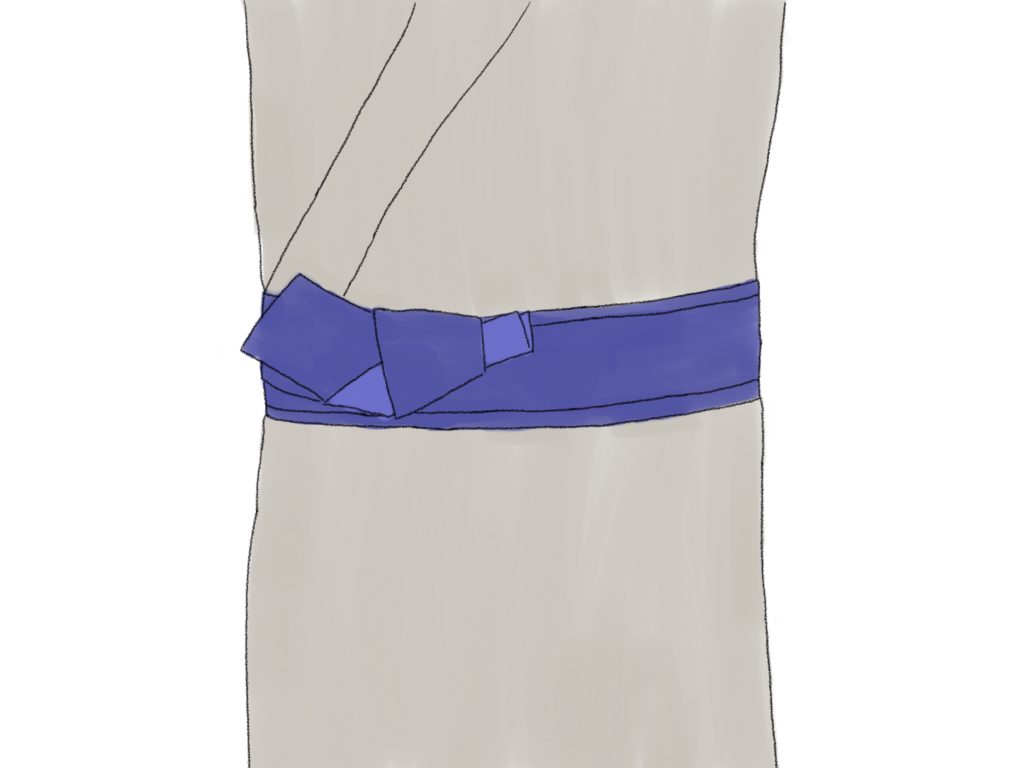
8, Treatment of wrinkles after turning the obi.
After tying the obi, the kimono will wrinkle. Wrinkles should be placed on the left and right sides.
I explained using illustrations. There is a Japanese saying “Hyakubun-ha-ikken-ni-shikazu”. It’s a saying that it’s faster to see it once than to hear it 100 times in a sentence. We will make a video in the future, so please watch it after uploading it.